Making the APPC Connection to the CMS GUI
By Alan Altmark, VM Development(C) Copyright International Business Machines Corporation 1996. All Rights Reserved.
This procedure shows you how to configure the APPC connection for CMS GUI. While some hints are given for VTAM, NCP, and AVS configuration, this document is not intended to address those components. This is not a complete "how-to" guide for APPC or LU 6.2. See the References section for additional sources of information.
The procedure assumes that:
- You are using Communications Manager/2 (CM/2) Version 1.11.
- You already have a connection to the host.
- You know what an LU is.
- You know if you are supposed to use APPN or not.
The following steps need to be performed to establish your
APPC connection:
1. Start CM/2 Configuration
2. Select Configuration File
3. Start APPC Configuration
4. Modify SNA local node characteristics
5. Select the link to the VM host
6. Identify AVS to your Workstation
7. Define a Local LU
8. Validate your Configuration
9. Verify your APPC Connection
Some steps can be skipped if you are using APPN. Look for
 as a signal that there are APPN issues to consider.
Non-APPN users will need the following pieces of information:
- The fully-qualified LU names of the AVS gateways you are going to use.
- The independent LU name assigned to you for APPC stuff.
Step 1: Start CM/2 Configuration
In order to configure APPC for your OS/2 workstation, go into your Communications Manager/2 folder and start the Installation and Setup application.
Select Setup.
Step 2: Select Configuration File
From the Open Configuration window you choose the configuration file that you wish to modify. Your current configuration name is displayed.
Select OK
Step 3: Start APPC Configuration
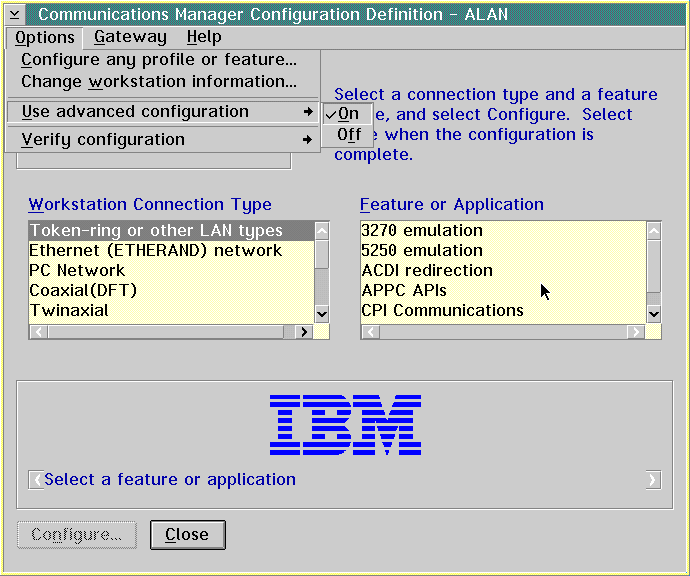
Before you begin configuration, you need to get into Advanced Configuration mode. Go to the menu bar and select Options -> Use advanced configuration -> On.
Then select your workstation connection type (usually LAN) and APPC APIs. Select OK.
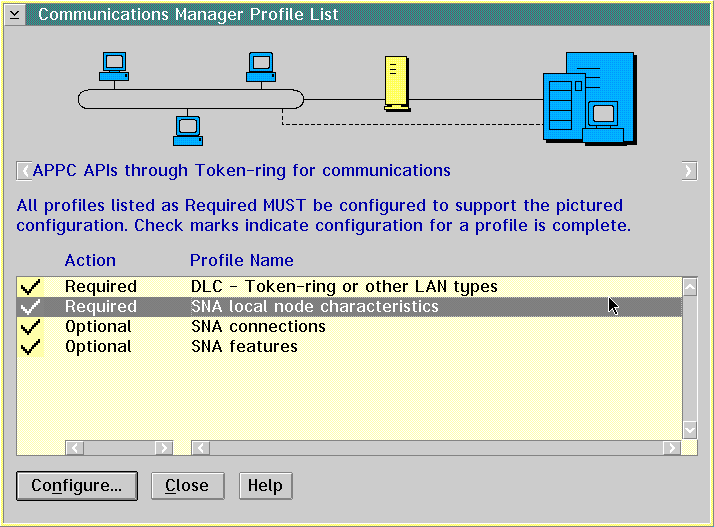
The Profile Listwindow is displayed.
Step 4: Modify SNA local node characteristics
Select SNA Local Node Characteristics. The Local Node Characteristics window is displayed, describing how your workstation identifies itself to the network. Make sure the information is correct.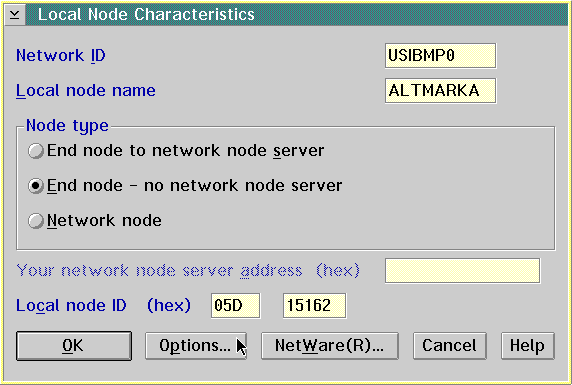
- Network ID
- This name is assigned to you by your network administrator.
- Local Node Name

- This name represents the SNA "intelligence" within your workstation. It is not a terminal LU or PU name. If your installation is using APPN, then this name was assigned to you by your network administrator.
- Node type
- This should be End Node - no network node server, unless you are using APPN.
- Local node ID
- This is much like Local Node Name, but instead of being a name, it is a number. Your network administrator gave you this number when you originally requested a connection to the VM host.
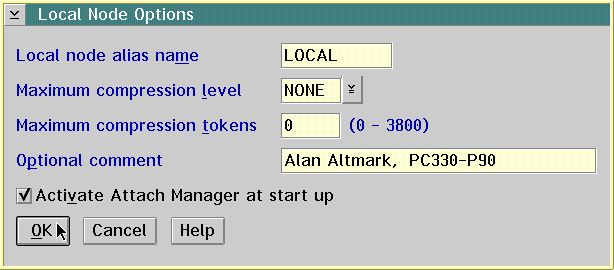
Click on Options. The Local Node Options window is displayed.
- Local node alias name
- It doesn't matter what this name is
- Maximum compression level
- Do not change
- Maximum compression tokens
- Do not change
- Activate Attach Manager at start up
- Should be checked
If you are using APPN, you can skip directly to
Step 8.
Now that you've defined your workstation to the network, you are ready to define AVS to your workstation. AVS is the part of VM that handles APPC communications between programs on VM and programs out in the SNA (VTAM) network.
Step 5: Select the link to the VM host
Select SNA Connections. The Connections List window is displayed.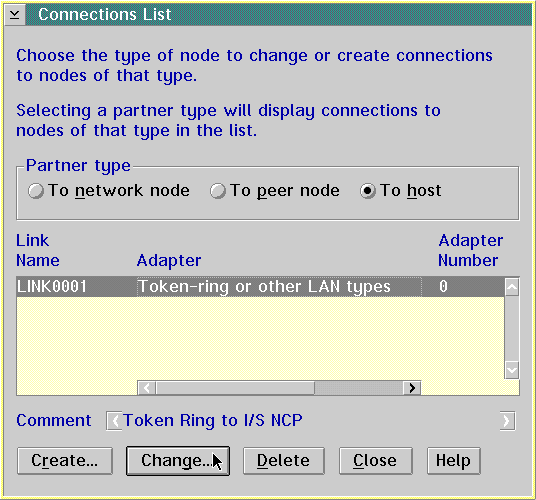
Select the link that represents your link to the VM host. The name may be of the form LINKnnnn or HOSTnnnn. Then click on Change.
The Adapter List is displayed and should indicate the type of adapter associated with the previously selected link. Click on Continue. The Connection to a Host window is displayed, showing you the nitty-gritty details about the connection. Enter or change only the following:
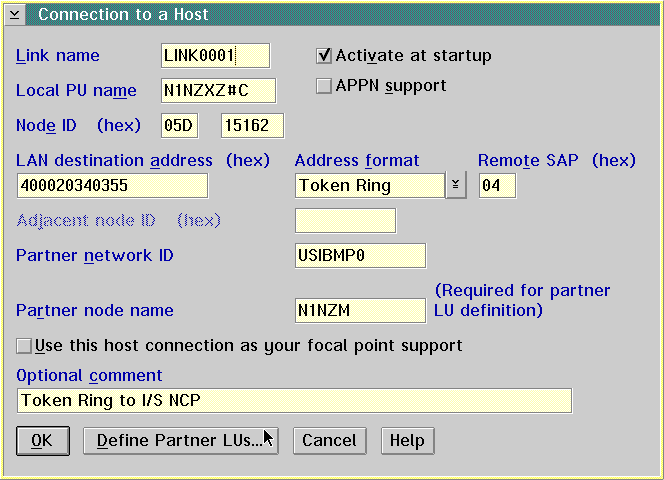
- Activate at startup
- Should be checked
- APPN support
- If the host is configured for APPN, check this box. Do not check this box unless you know APPN is supported.
- Local PU name
- This is a beast of a different color. If this is your only link, the PU name should be your Control Point (CP) name. If, on the other hand, you have more than one link, then only one of them requires the CP name and PU name to match. If possible, enter your assigned PU name.
- Partner network ID
- Enter the network id of the host system to which your workstation is attached. This may or may not be your VM host.
- Partner node name
- Enter the node name of the host system to which your workstation is attached.
- Optional Comment
- Put something descriptive here.
If the APPN support box was checked, select OK and skip to Step 8.
Otherwise select Define Partner LUs.
Step 6: Identify AVS to your Workstation
In the Partner LUs window you will define two LUs - one for AVS global gateway, and one for the private gateway.
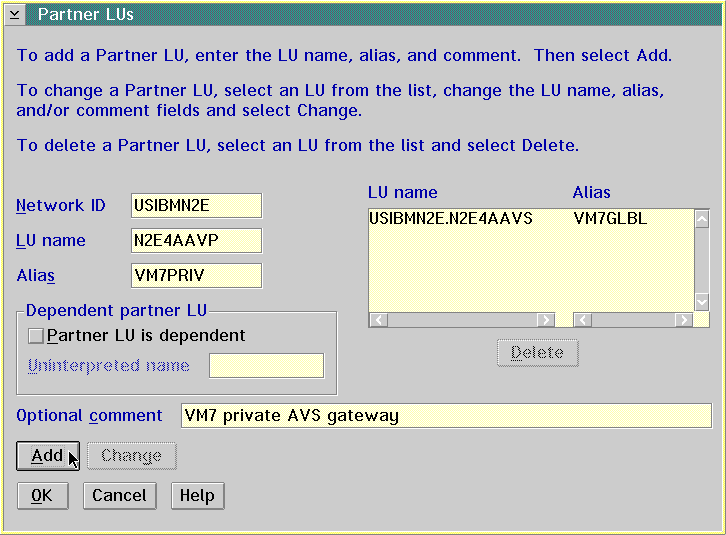
- Network ID
- Fill in the network id of your VM host. It may or may not be the same as the network id of your workstation.
- LU name
- Fill in the LU name of the AVS global gateway on your VM host. This name will be one of those shown if you issue the the CP QUERY GATEWAY command on your VM system.
- Alias
- This is a name of your own choosing. It can be anything as long as you haven't used it anywhere else in your CM/2 configuration.
- Partner LU is dependent
- This box must not be checked!
- Optional Comment
- Put something meaningful here, like "Global AVS gateway".
When you're done, press OK and work your way back to the Profile List window.
Step 7: Define a Local LU
Now that we have defined AVS to CM/2, we must define the new APPC LU assigned to you by I/S networking folks.Double-click on SNA Features. The SNA Features List window is displayed.
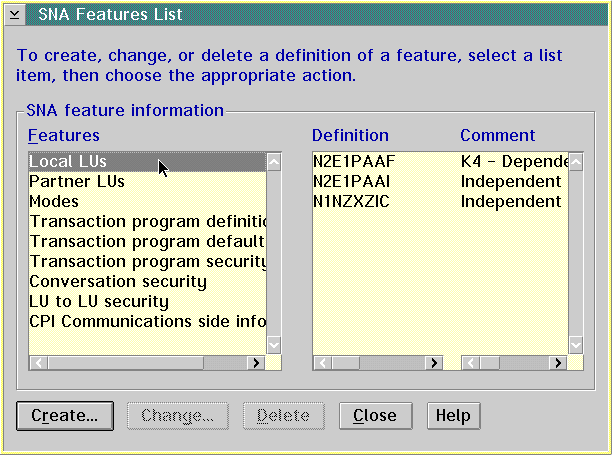
Double-click on Local LUs The Local LU window is displayed.
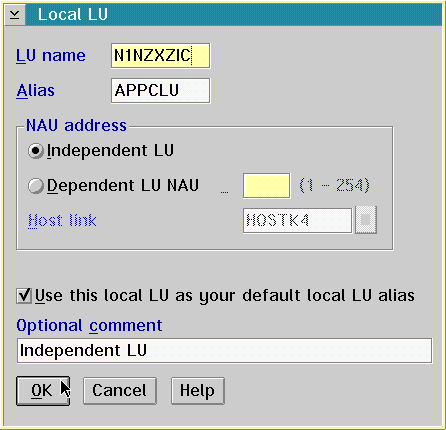
- LU name
- The name assigned to you by your network administrator for APPC (LU 6.2) functions.
- Alias
- A name you choose.
- NAU address
- Select Independent LU.
- Optional comment
- Put something meaningful here.
Click on OK. to return to the SNA Features List.
Step 8: Verify your Configuration
Now work your way back out of the CM/2 configuration program by selecting OK or Close as necessary.
When you close the last window, CM/2 will verify that your changes are consistent (but not necessarily correct!). It will ask you if you want to dynamically update your SNA resources. Answer NO.
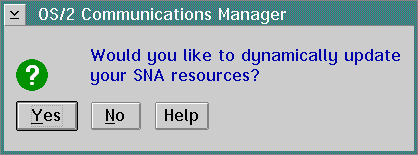
Go to an OS/2 command line and enter CMSTOP. This will shut down CM/2. When it has stopped, enter START CMSTART to get things running again. If you have difficulties, enter CMSTOP ABNORMAL, wait for CM/2 to stop (up to 60 seconds), then try START CMSTART again.
Step 9: Verifying your Connection
Well, here we are at last -- the final step in your long journey to become One with The Network.Issue these CMS commands:
- SET SERVER ON
- SET AUTOREAD OFF
- SET FULLSCREEN SUSPEND (if you use Fullscreen CMS)
Download CMSDESKR.CMD to your workstation. If you have a general "tools" directory, it is easiest simply to load CMSDESKR to that directory.
Download GUIAPPC EXEC to your workstation, then upload it to your VM user id as GUIAPPC EXEC.
Issue these OS/2 commands from an OS/2 command line:
- [C:\TOOLS]cpicrexx
- [C:\TOOLS]start vmgui
- [C:\TOOLS]set APPCLLU=alias
This is the alias you chose for your new LU in Step 7. If you are using APPN, do not issue this command; CM/2 will automatically use your Control Point LU. - [C:\TOOLS]cmsdeskr
You Don't Have to Be Logged On!
The wonderful thing about an APPC connection is the way VM/ESA supports it! The CMS Desktop can be started whether you are logged on or not (CP autologs you, if needed). The GUIAPPC EXEC starts the desktop for you. Your user ID will remain logged on as long as you are using the CMS desktop. Even when you finish with it, CP will wait for 30-60 minutes in case you need it again before logging you off.The Catch
But, naturally, there's no such thing as a free lunch! There are a couple of restrictions:- You cannot run with Fullscreen CMS. The way APPC private servers are implemented requires the CMS linemode console. If your profile issues SET FULLSCREEN ON, you will have to remove it, or only do it when the virtual console is real (i.e. not disconnected).
- Your profile must SET SERVER ON and SET AUTOREAD OFF.
The SET WORKSTATION Command
When you use the procedure described above, CMS will figure out the LU name assigned to your workstation. But if you want run CMS GUI applications other than the Desktop, you will need to tell CMS how to find your workstation. You do that by using the SET WORKSTATION command:
SET WORKSTATION LU gateway lunamePlace this command in your PROFILE EXEC. If you issue QUERY WORKSTATION after starting the Desktop, you will see the exact format of the SET WORKSTATION you should use.
VTAM, NCP, and AVS Configuration Tips
Here's a little cheat sheet of information to remember when configuring VTAM, NCP, or AVS.
VTAM
- Dependent LUs can only have one APPC session. Every GUI window requires at least two.
- Life is easier if you use the DYNLU=YES start option. Otherwise you have to pre-define each workstation's independent LU(s) as a CDRSC.
- Having VTAM run as a network node and the workstations as end nodes eliminates the need for workstations to define AVS to CM/2.
- If you don't use APPN and the workstations are not controlled by the same VTAM as AVS, users will have to put a CNOS statement into their CM/2 configuration file manually.
- Use as much dynamic VTAM definition support as you can.
NCP
- Remember to increase the NUMILU count on the LUDRPOOL statement, if necessary.
AVS
- It is probably best that you do not issue AGW ADD USERID for workstations unless you are fully aware of the security issues involved.
- Check your AVS console logs for PIU truncated messages. This indicates that applications are trying to use a logmode that has a too-large RU size.
References
Please send mail to Alan_Altmark at us.ibm.com if you have suggestions or comments about this document.
The information provided, and views expressed on this site are my own and do not represent the IBM Corporation.